If you've heard of Visual Basic for Applications macros (and feel perhaps you should be using them to be more productive), then this tutorial is for you! It explains how to record macros in Excel, and how to play them back to automate common tasks.
The tutorial series tells you what VBA is, how you might use it and how to record and run macros. If you find the tutorial inspiring, the next stage is to learn how to write macros in VBA from scratch.
Our Example - Copying, Pasting and Formatting Information
To see how VBA could help you, suppose that you are a data entry clerk for a major talent show on national TV. Every time there's a vote, the scores are entered into a spreadsheet:
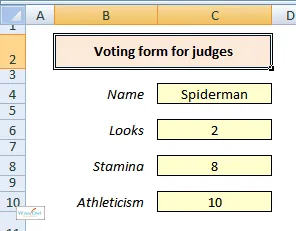
Whenever a vote is taken, the judges type their scores onto this spreadsheet. From here, your task is to copy the results faithfully into a results sheet.
You then need to copy this into a results sheet:

You have to type in a row for the new contestant's scores.
There are two main problems with this:
It takes ages - with all the copying/pasting and formatting involved, at least 20 mouse clicks for each contestant.
It's prone to error - you've noticed that you start making mistakes when you're tired.
You start dreaming - wouldn't it be fantastic if you could just click on a button to copy the results across:
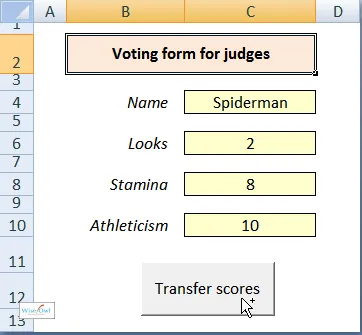
The magical button (if only you knew how to create it) ...
This tutorial shows you how to automate tasks like the one above using Visual Basic for Applications! But first, what is VBA?
The VBA Programming Language
You don't really need to know this, but it's good background ...
All computer programs are written using a programming language (examples are Python, C# and Visual Basic). The Visual Basic language - VB to its friends - is particularly favoured by Microsoft, and is used by millions of programmers around the world. Here's a bit of VB:
Select value
Case 0
Title = "Search results"
Me.lblBreadcrumbs.Visible = False
Exit Property
Case 1
Title = "Problem with page"
Me.lblBreadcrumbs.Visible = False
Exit Property
Case Else
End Select
You can see that the language looks half like English and half like meaningless computer gibberish.
Microsoft have included a cut-down version of this language within each Office application (Word, Access, Excel, PowerPoint, SharePoint, Outlook and Visio all include variants of VBA). This language is called Visual Basic for Applications, or VBA, because it's Visual Basic running within an application. Here's an example of VBA from Excel, taken from a hangman game:
Function DrawScaffold()
Dim Limb As Shape
Dim MadeVisible As Boolean
MadeVisible = False
For Each Limb In ActiveSheet.Shapes
If Limb.Visible = msoFalse And MadeVisible = False Then
Limb.Visible = msoTrue
MadeVisible = True
End If
Next Limb
Fortunately for you (and everyone else), you don't have to know how to write macros - you can just record them. Before we look at how to record a macro, let's see first what recording is.
What is Recording?
In some Microsoft Office applications, you can record macros:
Application | Recording possible? |
|---|
Access | No |
Excel | Yes |
Outlook | No |
PowerPoint | No |
SharePoint | No |
Word | Yes |
Within your computer is a man called Bob (or a woman called Bobette, if you prefer). Bob is sitting with his pen poised, ready to write out the Visual Basic commands corresponding to everything you do in Excel (or Word). All you need to do is to press the Record button.
For example, suppose that you click on the cell C4 in the input form and type in Spiderman. Here's what Bob will write down:
Range("C4").Select
ActiveCell.FormulaR1C1 = "Spiderman"
So all that you need to do is to record copying and pasting the information for our example, then formatting the results cells to get:
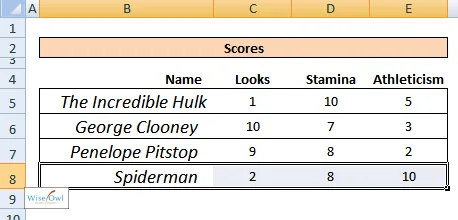
What you should get at the end of the process
So now we know what recording is - it's time to do it!
Starting to Record
To begin recording, click on the icon shown below:

Click on this icon to begin recording a macro.
You can now complete the dialog box which appears:
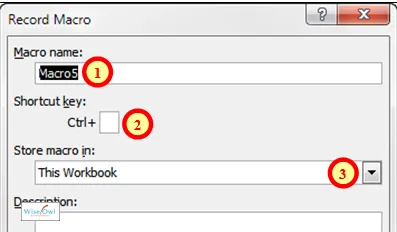
The following options are explained in more detail below:
Here's how to fill in the 3 parts of the dialog box shown above.
1 - Choosing a Macro Name
Macro names are subject to certain restrictions - the main one being that they can't contain spaces. Many people capitalise each part of their macro names:

This method of naming things is called camel case, after the ups and downs of a camel's back. Under this naming convention, English would include words like LeapFrog, RollerCoaster, CupBoard and LifeStyle.
Thus good names for our macro would be:
CopyResults
CopyScoresToResultsSheet
CopyAndFormatScores
Note that many people use underscore characters to make macro names more readable - for example, Copy_Scores_To_Results_Sheet.
If you don't like your macro name, it's easy to change it when you've finished recording.
2 - Choosing a Short-Cut Key
You can assign an upper or lower case letter to run your macro, but I strongly recommend the former!
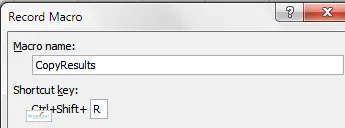
Hold down the SHIFT key when typing a short-cut key into the box to insert an upper case letter.
The reason is simple - many lower case letters are reserved. For example, many people use CTRL + R in Excel to copy cells to the right, and it will confuse people if this short-cut key runs your macro instead!
3 - Choosing where to Store your Macro
You have 3 choices:
Storage location | What it means |
|---|
Personal macro workbook | This will save your workbook in a special file called Personal.xlsm. The advantage of using this file is that Excel will automatically make its macros available to you whenever you have Excel open. |
This workbook | This will store your macros within your current workbook (obviously). |
New workbook | This will create a new workbook and record your macros into that. |
If you're new to Excel VBA macros, I'd recommend that you record into the personal macro workbook.
Now that you've started recording, you can perform a series of actions in Excel, knowing that the long-suffering Bob inside your computer will transcribe each into VBA's macro language.
Once you've started recording a macro, Excel (or the Bob/Bobette inside your computer) will transcribe everything you do into Visual Basic, until you stop recording. For this reason, you should proceed carefully! For our example, here's what you should do.
Step 1 - Copying each Name
Remembering that you are recording, you should follow these steps exactly to make your recorded macro do what you want. First, click on the first cell to be copied (C4 on the Input Form worksheet), and copy it:
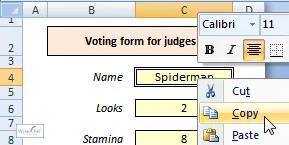
Right-click on each cell to be copied, and choose to copy it using the short-cut menu (as here) or any other way. Now go to the top of the list of names in the Results sheet.
Now select the top person:

Select the top "person" in the list of names.
You now want to select the first non-blank cell in the list. To do this, you want to record the instructions:
rather than the instructions:
You therefore need to switch from absolute to relative recording.
Step 2 - Switching to Relative Recording
To change the way Excel records macros:
Choose the Developer tab on the ribbon (if you can't see this, see these instructions).
Choose to use relative references.

Click on this tool to switch to using relative references (or to switch back to absolute ones, if it's already selected).
Switching between absolute and relative recording is one of the few things for which Excel will not record commands.
Step 3 - Pasting the Names
You can now paste in the name you've copied. First go to the top of the column of names:

Go to the top of the column.
Then press CTRL + the down arrow to go to the bottom of the block, then press the down arrow again to go to the first blank:

You should now be on the first blank cell beneath this one.
Step 4 - Formatting the Results
If you patiently repeat the steps above, you will eventually build up a row of copied data:
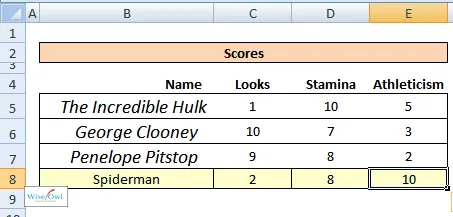
The results of copying and pasting - the right data, but with the wrong formatting
You can now format the cells using the standard formatting tools so that:
the first cell is in a larger font;
the other cells are vertically aligned centrally; and
the whole row has an outline border.
Here's what the final result could look like:
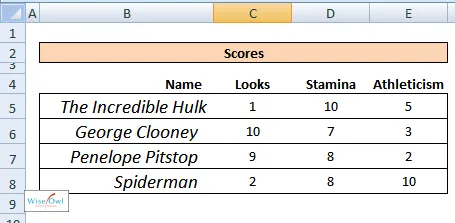
The final result, correctly formatted
You can now stop recording!
Step 5 - Stopping Recording
To stop recording, click on the tool shown below:

Click on the button shown to stop recording.
You should now have a macro which copies a contestant's score to the results sheet. It's time now to tidy it up!
You could omit this last stage, but it's likely that you made several mistakes in the recording process which you'll need to rectify, and it can't do any harm to check what you've done!
Alexander Pope wrote:
A little learning is a dangerous thing;
drink deep, or taste not the Pierian spring:
there shallow draughts intoxicate the brain,
and drinking largely sobers us again.
Finding your Macro
You can't edit a macro until you can find it. To do this, press ALT + F11 to go into the VBA code editor (this opens up a separate application). You should then find your macro:
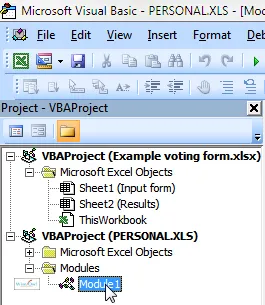
Expand the workbook into which you recorded your macro (here the personal macro workbook), then expand the Modules category. You can then double-click on Module1.
A module is the name given to the place in which VBA programming code is stored. Think of it as a blank sheet of paper into which Excel writes instructions in its own special language.
Tidying up the code
Here are some ideas for how to simplify your code! Note that your macro won't look exactly the same as this one, but you should be able to get ideas from what follows. Don't worry about making changes - you can add, delete and edit lines in the code window as you see fit, to change the way that your macro behaves.
Perhaps a good start is to remove unnecessary comments:
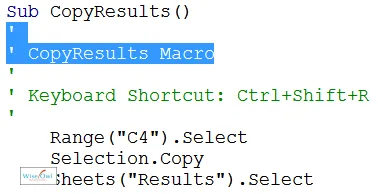
Comments are the lines which begin with an apostrophe - ' - and are in green. The ones shown selected add no value, and can be deleted!
The next bit copies a contestant's name - I've added a comment before it:
Range("C4").Select
Selection.Copy
The next thing is to go to the first blank cell on the Results sheet, and paste (again, I've added comments):
Sheets("Results").Select
Range("B4").Select
Selection.End(xlDown).Select
ActiveCell.Offset(1, 0).Range("A1").Select
ActiveSheet.Paste
When the macro has finished copying and pasting, it's time to look at the formatting. Firstly, my macro removes any background colour from the pasted cells:
Application.CutCopyMode = False
ActiveCell.Offset(0, -3).Range("A1:D1").Select
With Selection.Interior
.Pattern = xlNone
.TintAndShade = 0
.PatternTintAndShade = 0
End With
The code to change the font size of the left-hand cell is a fair bit longer than it needs to be:
Selection.Font.Name = "Calibri"
The code to set vertical alignment likewise reproduces every part of the Alignment tab of the FORMAT CELLS dialog box:
With Selection
.VerticalAlignment = xlCenter
End With
The code to set borders carefully considers every possible part of a cell's borders:
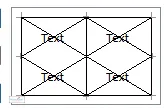
When setting the borders for a cell, you can set:
Based on this information, you should be able to simplify these lines of code!


