Getting to the Visual Basic Editor
The Visual Basic Editor is the application within which you write VBA code. The easiest way to get to the VB Editor is with a keyboard shortcut - just hold down the ALT key on the keyboard, and then press F11.

This is how the VB Editor should look the very first time you open it.
In the above diagram, the two windows that we've highlighted are:
1. The Project Explorer
2. The Properties window
The VB Editor application is the same regardless of which Office application you are in when you open it.
You can use the shortcut ALT + F11 at any time to toggle between the VB Editor and the Office application you are working in. Much quicker than clicking with the mouse!
If you can't see the two windows that we've highlighted in the image above, you can go to the View menu at the top of the VB Editor to display them.

You can click the options shown here to show the two relevant windows, or use the keyboard shortcuts that are listed next to the options in the menu.
Working with Projects
A project is the name for the collection of VBA objects that are part of the file you are working on. A project is created automatically when you open a new Office file (such as an Excel workbook, Word document, or PowerPoint presentation), and you can only have one project associated with one file.
The only useful thing you can really do with a project at this point is to rename it.

This project was called VBAProject until recently ... but there's not that much point renaming projects.
Although you can only have one VBA project for each Office file, you might also see other projects listed when you go into the VB Editor. These extra projects include things like the Personal Macro Workbook in Excel or the Normal template in Word.
Working with Modules
Before you can start writing any code, you need to insert a module. A module is the electronic equivalent of a blank piece of paper. Each project can contain multiple modules - the exact number you have will depend on the size and complexity of the system you are developing, as well as your personal preference on how to organise your code.
To insert a new module, right-click on the VBA project you want to insert the module into, and from the menu choose: Insert -> Module

You can actually right-click anywhere in the project you are working on to do this, but it's easier to spot the bold text of the project name when you have several files open.
When you've done this, you'll see a new item in the Project Explorer window, and the great white expanse of the module you've just created taking up most of the right hand side of your screen.
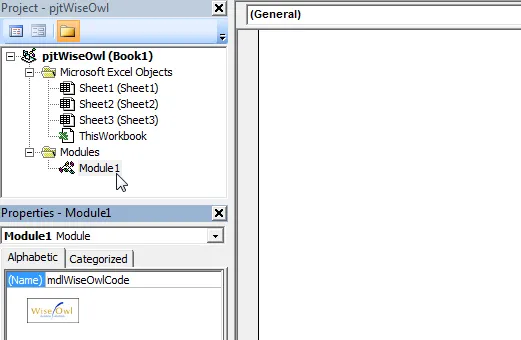
You can rename a module in the same way you renamed a project earlier: select the module in the Project Explorer, and type in a new name in the Properties window. Again, you can't use spaces or most of the punctuation characters - stick to text and numbers to be safe!
Creating a Subroutine
The most common type of program you're likely to write in VBA is called a subroutine, or sub for short. You can start writing a subroutine by typing the word sub at the top of the module you created earlier (we're using Excel for this demonstration).
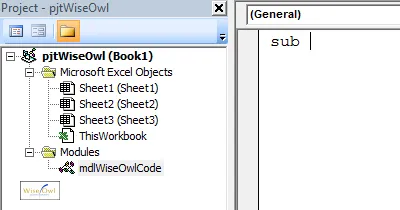
Type in the word sub, followed by a space to get started with your subroutine.
You'll hear lots of words used to refer to a subroutine - program, procedure, macro, and sub for instance. They all mean essentially the same thing - a set of instructions that an application will follow when you run the subroutine.
The next thing you need to do is type in a name for your subroutine. Names for subroutines follow the same rules as names for projects and modules: don't use spaces and try to avoid punctuation characters. If you can make the name of your program unique and descriptive then all the better! The program we're going to write in this first example will simply create a new Excel workbook and write a title into cell A1 on the first worksheet. We'll call our subroutine CreateAndLabelNewFile. Type this into your module after the word sub.
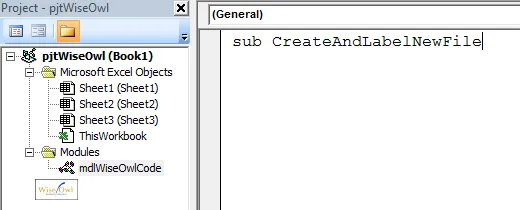
Notice we've typed in the word sub in lowercase letters, but used uppercase letters to start each word in the name of the subroutine. This is a common convention used in VBA programming to make it easier to read the names of things.
The only other thing you need to do to create your subroutine is to press Enter on the keyboard, so do just that!
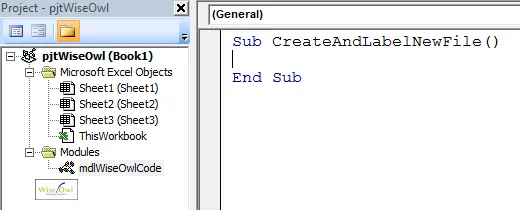
Congratulations, you've created a subroutine! Obviously it doesn't actually do anything yet, but we're getting to that part.
Assuming that you didn't see an error message, several things should happen automatically when you press the Enter key:
The word sub is capitalised to Sub.
The word Sub is coloured in dark blue.
A set of parentheses is added to the end of the subroutine name.
The words End Sub appear on the line below your text cursor.
All of these things are important, but the VB Editor does the work for you - it's like a more helpful and fancy version of the Notepad application.
If something went wrong and you saw an error message when you pressed Enter, the two most likely reasons are:
1. You put a space or other disallowed character in the name.
2. You typed in a name that is reserved by the VBA language.
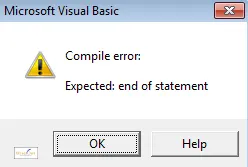
If you see this error message, just click OK and make sure that your sub's name doesn't contain any spaces or punctuation characters.
So far, the code that we've written doesn't actually perform any useful actions. That's something we'll solve in the next article in this series, but first you should learn a little about how to lay out your code neatly.
The Importance of Neat Code Layout
Once you've created your subroutine, you can start typing the VBA code on the very next line. The problem with doing this is that when you come back to look at your code later you'll find yourself staring at a horrible looking chunk of text that's very difficult to read.
You can make your life much easier by using blank lines to separate parts of your code, and indenting text within a subroutine to make it easier to see where it starts and ends. To do this, once you've created your subroutine by pressing Enter, press Enter once more to create a blank like, and then press Tab on the keyboard to indent your code.
 |  |
Your text cursor should start here... | ...and end here. |
It may seem like a pedantic thing to do, and technically speaking it's not even necessary, but it will definitely make your life easier in the long run. Trust us! You can hopefully see the benefits of this approach by comparing the two screenshots below (even if you don't understand the actual code!). Here's the first screenshot, without any formatting:

Without a neat layout to the code it's extremely difficult to work out what's going on in this subroutine.
Here's the second screenshot, with formatting:

The simple addition of a few blank lines and indents makes the whole subroutine much easier to read.
Adding Comments to Your Code
Another thing that will help you enormously when looking at your code later is a series of comments that explain what your program does. You can add a comment either on a separate line or at the end of a line of code by typing an apostrophe. You can then type whatever you like and press Enter at the end of the line to create the comment.

A typical comment.
You can see more information on the art of commenting code here. It might seem like a lot of effort, but you'll thank yourself for doing it later on!
The Basic Grammar of VBA
VBA is a language, and like any language it has grammatical rules that you need to follow if you want to make sense when you're "speaking" it. Generally when you're writing VBA programs, most of the time you'll be attempting to perform some kind of action on some sort of object. The structure of a line of code that performs an action on an object is very consistent in VBA - you always start the sentence by referring to the thing you want to do something to, followed by the action you want to perform, and you use a full stop to separate the two. So, very generally speaking, a basic sentence in VBA would look like this:
In VBA terms, the Thing part of the above sentence would technically be called either a collection or an object. The Action part of the sentence would be referred to as a method. So, the technical way of representing the above sentence would look like this:
or:
Bearing this in mind, we're going to write a line of code that will apply the Add method to the Workbooks collection.
Writing Your First Line of Code
In our first line of code, the collection part of the sentence is the word Workbooks. Workbooks is the name for the collection of all of the currently open Excel files. Type it into your code and follow it immediately with a full stop.
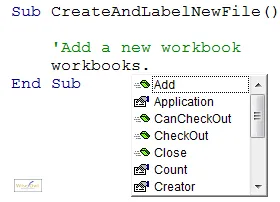
Typing in a full stop after a word that VBA recognises presents you with a list of other words you can use to finish the sentence.
After typing in the full stop you should see a list of keywords appear automatically. This feature is referred to as Intellisense - horrible name, useful feature! The next section describes several ways to use Intellisense to save you as much typing as possible.
Using Intellisense to Complete a Sentence
After the Intellisense list appears we can complete our sentence in a number of ways. The method part of our line of code is the word Add - to get this word into your code you could do any of the following:
Option | Effect |
|---|
Type the word manually. | The word is typed in and the cursor stays at the end of the line.
|
Use the mouse to scroll to the word you want and double-click on it. | The word is inserted automatically and the cursor appears immediately after the word. |
Use the arrow keys or start typing the first letters of the word to highlight it in the list, then press Tab on the keyboard. | The word is inserted automatically and the cursor appears immediately after the word. |
Use the arrow keys or start typing the first letters of the word to highlight it in the list, then press Enter on the keyboard. | The word is inserted automatically and the cursor appears on a new line below the previous one. |
Probably the quickest technique to use in this example is to type in the letter A which will automatically select the word Add in the list, and then press Enter.
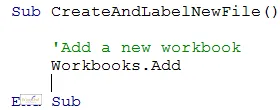
Congratulations, you've finally written your first line of code! When we get around to running our subroutine, this line will create a new workbook.
Adding items to a collection is a standard way to create new objects in VBA. The screenshots below show examples of doing this in Word and PowerPoint.
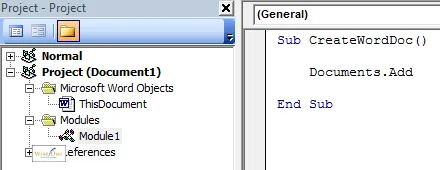
In Word, the collection of open files is called Documents.
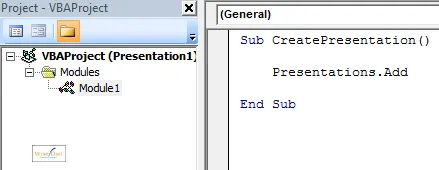
In PowerPoint, the collection of open files is called Presentations.
Changing Things in VBA by Using Properties
So far we've seen how to create a new workbook in Excel VBA by applying the Add method to the Workbooks collection. Now that we've done this we need to add some text to some of the cells in the file that we've just created. We're going to do this by modifying a property of an object. Properties are like methods in that they always appear after the object or collection in a VBA sentence. Unlike methods, you can assign a value to a property to change it in some way. The basic grammar of a line of code to do this would look like this:
Object.Property = SomeValue
or:
Collection.Property = SomeValue
The object we are interested in is a cell, which is referred to as a Range in Excel VBA, and the property we want to change is called Value. Type the following into your code:
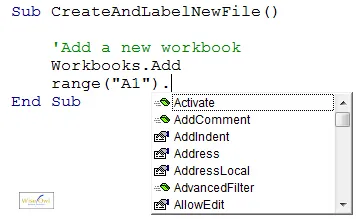
You can identify the properties in the list by their "finger pointing at a piece of paper" symbol.
Referring to a Range object is slightly more complicated than referring to the Workbooks collection because we have to say which cell we are interested in. We do this by typing a cell reference (here it is A1) inside a set of round brackets and double-quotes. Next, we can type in a full stop to display the list of properties and methods.
The quickest way to select the Value property from the list is to do the following:
Type in the letter V to jump to the word Validation.
Press the down arrow key on the keyboard to select Value.
Press Tab.
This should leave you with a subroutine looking like this:
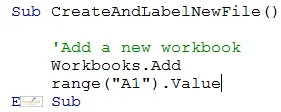
The only remaining thing is to say what we want to change the value of the cell to.
We can now say what text we want to appear in the cell. To do this we need to type in an equals sign, = followed by the text. All literal text in VBA must be enclosed in a set of double-quotes. Type in the following and press Enter at the end of the line.

When you press Enter at the end of the line you should see a space appear on either side of the equals sign.
As a final flourish in our very basic program, we're going to write a line that will put today's date into another cell on the spreadsheet. This line will look very similar to the one we've just created, so type in the following code. Try to remember the quickest way to use the Intellisense list - hint: it doesn't involve the mouse!

Press Enter at the end of the line and you should see the word date becomes capitalised.
Rather than putting in the date as a string of literal text, we've used a built-in VBA function called Date. This function calculates what today's date is each time the code is run (based on your computer's clock) and puts the result of the calculation into the cell.
Running a Subroutine for the First Time
Before you try to run a macro you should always save it first.
Although there are many ways to run macros, we're going to run our code from within the VB Editor. To do this, click anywhere in the subroutine you want to run, and then either:
Press F5 on the keyboard.
From the menu, select: Run -> Run Sub/UserForm.
Click the Run Sub/UserForm tool on the toolbar, as shown below.

The Run tool looks like a green triangle pointing to the right.
Wise Owl does not recommend the use of crossed fingers, lucky four-leaf clover or prayer when running subroutines. In our experience it doesn't help and encourages sloppy programming.
If nothing went horribly wrong and you didn't see any error messages you can now switch back into the Office application (ALT + F11) to see if your macro worked.
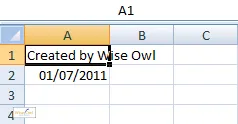
Success! It's surprising how satisfying it can be when even a simple macro works first time.
If you were unlucky enough to have something go wrong when you tried to run your code, the next article in this series will give you a few pointers about how to go about identifying and fixing the problem.
Stepping Through a Subroutine
When you run a subroutine using the methods described above you'll find that the code is executed as quickly as the Office application can carry out the instructions. As a developer it's nice to be able to slow down the running of your code so that you can watch what's happening as each line is executed. This technique is called stepping through code. Before stepping through a subroutine it's useful to shrink down, or restore, the VB Editor window so that you can see the Office application in the background.

In Windows 11 if you click on the icon at the top right of Excel or VBA you can choose this option to split your screen into two equal vertical parts.
Another nice way to split your screen is to hold down the Windows key (you'll find it at the bottom left of most keyboards) and press the right or left arrow key to lock the current application on the right or left side of your screen. Try it!
When you've got your screen set up (perhaps with Excel on the left, and your VBA window on the right), you can start stepping through your code and watch what happens in the background. To do this:
Click into the subroutine you want to run in the VB Editor.
Press F8 on the keyboard to start the subroutine.
Press F8 to run the line of code that is highlighted in yellow - continue doing this until the subroutine ends.
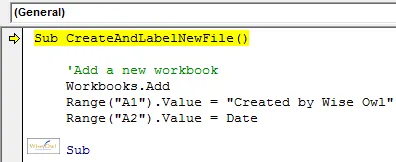
Press F8 to run the line that is currently highlighted in yellow. Carry on doing this until you have run the End Sub line.
Take care that you don't keep pressing F8 after you have run the End Sub line. If you do, your subroutine will start again at the beginning!
If you get bored of stepping through a long subroutine, you can always press F5 at any stage to run the rest of the code, or click the Reset tool (it's the one that looks like a little blue square) on the toolbar to stop the code running.
Let's now consider a few of the common mistakes people make when running VBA code and how to get around them.
Common Mistake 1 - Not Selecting the Correct Subroutine
If you are running your code from within the VB Editor, you have to select the subroutine you want to run before you try to execute it.
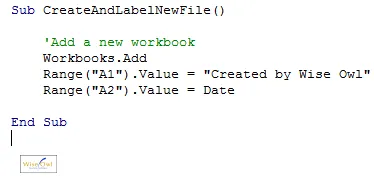
If the text cursor isn't within the subroutine you want to run, the VB Editor won't know which one to run.
If you don't have a subroutine selected at all you will see a dialog box appear to ask you which one you want to run.
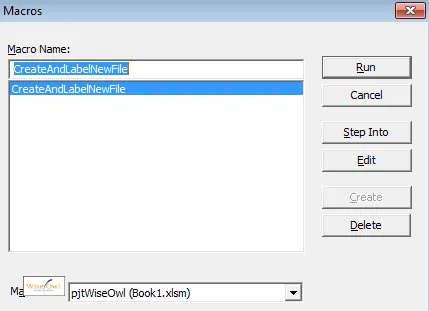
You could always select the macro at this point and click Run, but it's much easier to just click in the macro you want before you try to run it!
Common Mistake 2 - Syntax Errors
Syntax errors are mistakes in the punctuation of your VBA sentences. These are very easy to spot because as soon as you make a syntax error and try to move the cursor to a different line of code, the offending line will be highlighted in red.
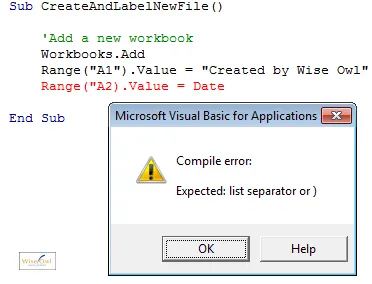
With the default settings in the VB Editor, you will also see a dialog box attempting to explain the problem.
To solve this issue, click OK on the message that appears and then try to amend the line of code that is flagged in red. Here the mistake we've made is to miss the double-quotes after the cell reference A2. When you have edited the line of code, move the cursor to a different line to check that it doesn't get highlighted in red again.
The dialog box that pops up to warn you about syntax errors is never particularly useful, and it's quite annoying to have to click OK before you can fix the problem. You can turn off this warning message (but still have syntax errors highlighted in red) by selecting: Tools -> Options... and then completing the dialog box that appears as shown below:
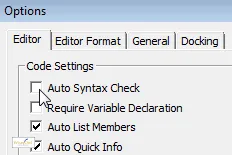
Make sure the Auto Syntax Check box is unchecked and then click OK to make sure you don't see the annoying pop-ups every time you make a mistake.
Common Mistake 3 - Compile Errors
When you choose to run a program that you've written in VBA, the VB Editor first of all compiles your code to make sure that all the words make sense in the context you've used them. A compile error is a problem that occurs at the compile stage but before your code has actually started running.
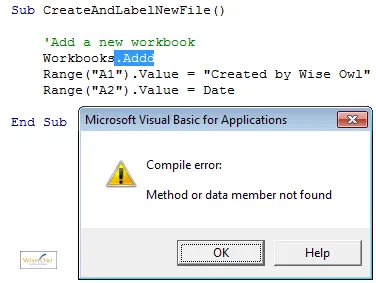
In this example we've misspelt the name of the Add method. The VB Editor has helpfully highlighted this for us so our job of fixing it is as easy as possible.
To fix a compile error, click the OK button on the message that appears and try to identify what is wrong with the part of the code that has been highlighted. Compile error messages are often quite descriptive, like the one shown below:
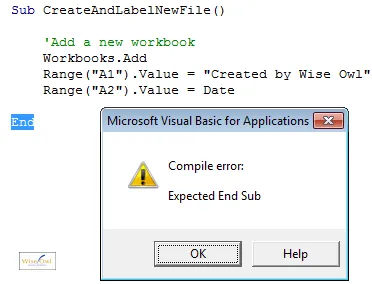
It's fairly obvious what this error message means, and as if it wasn't obvious enough the offending part of the code is highlighted again.
You can ask the VB Editor to compile your project without trying to run a subroutine by selecting: Debug -> Compile ProjectName
Common Mistake 4 - Run-Time Errors
Run-time errors are errors that occur when your program has successfully passed all of its syntax checking and compiling and is in the process of running. Any executable line of code has the potential to generate a run-time error and it's not always obvious why one has occurred. The diagram below shows an example of a run-time error:
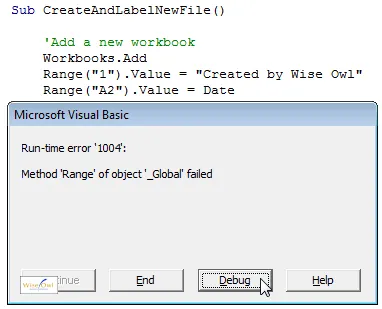
It's not immediately obvious what's gone wrong here as run-time errors don't highlight any of your code immediately. You can click the Debug button to see which line of code has failed to run.
When you click the Debug button on a run-time error dialog box, the line of code that has failed will be highlighted in yellow. In the example below you can see that it's the second line of code that has gone wrong.
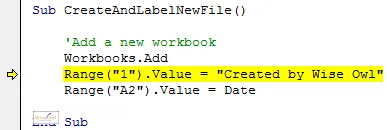
Closer inspection should reveal a mistake in the cell reference we've typed in.
This is just one of many examples of run-time errors that you'll experience when running VBA code. Run-time errors are often the most difficult to resolve and there's really no substitute for experience when things get tricky. The best way to learn is to try something, get it wrong, and then fix it!


