This tutorial shows how you can use SQL to create tables. All of the SQL that you'll need will be shown as we go along. Just before we begin, though, let's look at two alternatives to writing SQL code.
Alternatives to Creating Tables Programmatically
It probably goes without saying, but you don't need to write SQL script to create tables:
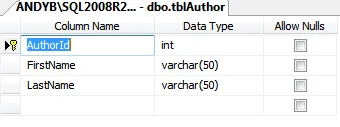
You can design tables in SQL Server Management Studio (SSMS), specifiying for each column a name and a data type.
Scripting Table Creation
If you already have a table, you can use this to generate SQL script:

You can right-click on any table in SSMS and choose to create a new table from it.
This will generate script, which you can then edit as you see fit:
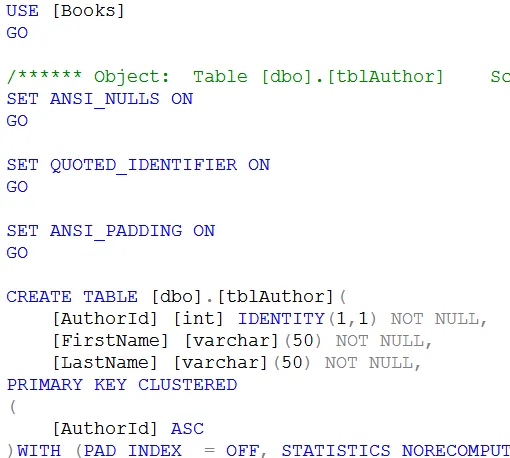
A small part of the script generated by the above menu option.
However, this blog is going to concentrate on writing script from scratch.
If you're wondering why this might be a useful thing to do, SQL works with sets of rows at a time, and it's frequently useful to create ad hoc temporary tables to hold these.
To start with, let's look at how you might first create a database to hold your tables.
Tables that you create have to belong in a database, and you can create one of these in SQL. The command is:
CREATE DATABASE NameOfDatabase
So if you were creating a database to hold books and authors, you might run:
CREATE DATABASE Literature
As always with SQL, you have to be careful to refresh your server in order to be able to see your new database:
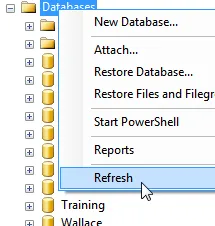 |  |
Right-click on Databases ... | ... to show your new one. |
You can also delete any existing database before creating a new one, to make sure you start with a clean slate:
BEGIN TRY
DROP DATABASE Literature
END TRY
BEGIN CATCH
END CATCH
CREATE DATABASE Literature
Now that we've got a database, it's time to create a new table in it!
If you want complicated syntax structures, you can get these from the Microsoft website; this blog concentrates on practical examples.
Creating Simple Tables
To create a simple table, just list out all the columns that you want to create, giving each a name and a data type:
CREATE TABLE tblAuthor (
FirstName as varchar(100),
LastName as varchar(100)
)
You can see a separate blog on the possible data types that you can use, but here are some of the main ones:
What you're storing | Use | Notes |
|---|
Any string of text | varchar(n) | A string of text with up to n characters. |
Any whole number | int | Any whole number (eg 42). |
Any other number | float | Any other type of number (eg 3.14). |
Any date | date | Any date |
Any yes/no value | bit | Either 0 (False) or 1 (True). |
Setting a Primary Key
You can set which column in a table is the primary key using the PRIMARY KEY key words, and make this automatically number rows using IDENTITY:
CREATE TABLE tblAuthor (
AuthorId int IDENTITY(1,1) PRIMARY KEY,
FirstName varchar(100),
LastName varchar(100)
)
INSERT INTO tblAuthor(
FirstName, LastName
) VALUES (
'Barbara','Kingsolver'
)
INSERT INTO tblAuthor(
FirstName, LastName
) VALUES (
'Ian','Banks'
)
SELECT * FROM tblAuthor
What the above code would do is to create and show the following rows:

The rows returned by the above SQL.
Notice that because we've used the IDENTITY keyword, there is no need to specify the AuthorId field when inserting records - its value will be generated automatically, beginning at 1 and incrementing by 1 for each new row.
Setting Default Values for Columns
You can specify for any column that it should take a default value if not specifically set. Here we set the date added column to default to today's date:
CREATE TABLE tblAuthor (
AuthorId int IDENTITY(1,1) PRIMARY KEY,
FirstName varchar(100),
LastName varchar(100),
DateAdded datetime DEFAULT GetDate()
)
If you insert rows into the table, you can choose whether or not to set a value for the DateAdded column:
INSERT INTO tblAuthor(
FirstName, LastName
) VALUES (
'Barbara','Kingsolver'
)
INSERT INTO tblAuthor(
FirstName, LastName, DateAdded
) VALUES (
'Ian','Banks', '01/01/2012'
)
SELECT * FROM tblAuthor
The results of running this query will look like this (assuming "today" is 05/10/2012):

The date has been explicitly set for the second author.
Preventing Null Values for Columns
In our simple authors table, it's likely that we'll want to ensure the last name is always filled in. You can do this by using the NOT NULL keywords:
CREATE TABLE tblAuthor (
AuthorId int IDENTITY(1,1) PRIMARY KEY,
FirstName varchar(100),
LastName varchar(100) NOT NULL,
DateAdded datetime DEFAULT GetDate()
)
If you then insert a row, you'll get an error if you don't specify the last name, but the first name can still be null:
INSERT INTO tblAuthor(
LastName
) VALUES (
'Kingsolver'
)
SELECT * FROM tblAuthor
Thus the SQL above would create one row, with the first name appearing as NULL:

The results of running the SQL above.
Adding Constraints to a Column
Sometimes you want to ensure that a column in a table will only accept certain values (for our example, we might want to add a rating, which must be between 0 and 10). You can do this by adding a constraint to the table.
To show how this works, let's first create a table containing a Rating field:
CREATE TABLE tblAuthor (
AuthorId int IDENTITY(1,1) PRIMARY KEY,
FirstName varchar(100),
LastName varchar(100),
Rating int
)
Now we'll add in an author with a rating outside the permissible bounds:
INSERT INTO tblAuthor(
FirstName,LastName, Rating
) VALUES (
'Barbara', 'Kingsolver', 11
)
To add a constraint, we have to alter the definition of the table:
ALTER TABLE tblAuthor WITH NOCHECK
ADD CONSTRAINT tblAuthorCheckRating
CHECK (Rating>=0 and Rating <>
A couple of notes about this:
You have to call the constraint something. Here we've called it tblAuthorCheckRating to ensure that this name won't be used elsewhere in the database.
We need the words WITH NOCHECK to ensure that the constraint isn't applied to existing data (which would fail the check).
If we try adding another author with rating 11 now ...
INSERT INTO tblAuthor(
FirstName,LastName, Rating
) VALUES (
'Ian', 'Banks', 11
)
SELECT * FROM tblAuthor
... we'll generate an error, and the row won't be added:

The error you'll see if you run the SQL above.
Indexing Columns
You can index a column to speed up sorting and searching by it. For our authors table, it's likely that we'll frequently want to sort authors by their last name, so we'll index this field:
CREATE TABLE tblAuthor (
AuthorId int IDENTITY(1,1) PRIMARY KEY,
FirstName varchar(100),
LastName varchar(100),
)
CREATE INDEX ix_tblAuthor_LastName
ON tblAuthor(LastName)
The index name must be unique over all tables, which is why we've used the naming convention ix_TableName_ColumnName.
This page of the blog shows you how to create links between two tables (or foreign key constraints, if yoiu want to be technical).
Our Example
Suppose we create two tables: one to hold authors, and one to hold books:
CREATE TABLE tblAuthor (
AuthorId int IDENTITY(1,1) PRIMARY KEY,
FirstName varchar(100),
LastName varchar(100)
)
INSERT INTO tblAuthor(FirstName,LastName)
VALUES ('Stieg','Larsson')
INSERT INTO tblAuthor(FirstName,LastName)
VALUES ('John','Wyndham')
CREATE TABLE tblBook(
BookId int IDENTITY(1,1) PRIMARY KEY,
BookName varchar(100) not null,
AuthorId int
)
INSERT INTO tblBook(BookName,AuthorId)
VALUES ('The day of the Triffids',2)
INSERT INTO tblBook(BookName,AuthorId)
VALUES ('Girl with the dragon tattoo',1)
INSERT INTO tblBook(BookName,AuthorId)
VALUES ('The Chrysalids',2)
INSERT INTO tblBook(BookName,AuthorId)
VALUES ('The Kraken wakes',2)
INSERT INTO tblBook(BookName,AuthorId)
VALUES ('The girl who played with fire',1)
The SQL above would give us two tables, as yet unlinked:
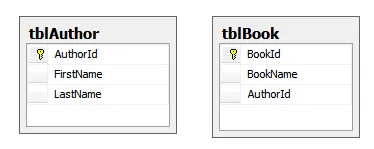
We need to link these tables by the AuthorId field.
We'll create SQL to join the two tables together:
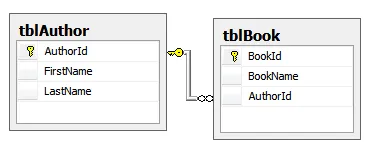
The two tables should be linked by a relationship.
If you're not sure about the principles involved, have a look at my earlier blog on database design.
The SQL to Create Foreign Key Constraints
Here's how we could create the relationship above:
ALTER TABLE tblBook
ADD CONSTRAINT fk_tblBook_tblAuthor
FOREIGN KEY (AuthorId)
REFERENCES tblAuthor(AuthorId)
ON UPDATE CASCADE
ON DELETE CASCADE
This then means that you can't enter a book with an author id which doesn't exist in the table of authors (that is, you can't have orphan books).


