Read our blogs, tips and tutorials
Try our exercises or test your skills
Watch our tutorial videos or shorts
Take a self-paced course
Read our recent newsletters
License our courseware
Book expert consultancy
Buy our publications
Get help in using our site
465 attributed reviews in the last 3 years
Refreshingly small course sizes
Outstandingly good courseware
Whizzy online classrooms
Wise Owl trainers only (no freelancers)
Almost no cancellations
We have genuine integrity
We invoice after training
Review 30+ years of Wise Owl
View our top 100 clients
Search our website
We also send out useful tips in a monthly email newsletter ...
Convert a cell value into a column in Power Query |
---|
This blog explains how to extract the value of a single cell in a Power Query query and then use this value to label every row in a table. |
When importing data from an Excel worksheet into a Power Pivot data model using Power Query I wanted to take the value of a single cell and copy it to each row in the table.
Here's the data I was importing, with the value I wanted in the top left cell:
The data was downloaded from the BFI's website.
I wanted the output to look something like this:
The value of the top left cell appears on each row of the table.
Power Query allows you to perform many types of transform using a combination of right-clicking, choosing ribbon options and filling in dialog boxes. You don't often have to get your hands dirty with writing M code but, for this example, that's exactly what we need to do as there is no convenient menu option to select.
To begin, it's worth identifying the name of an existing query step which includes the value we want as part of its output.
I've selected the Changed Type step and can see the value I want in the first row of Column1 in the output.
There are several ways to add new steps to a query but for this example it's perhaps easiest to use the M code editor. To open it, from the ribbon choose Home | Advanced Editor to see the existing code of your query.
You can see the three applied steps of your query on lines 2 - 4 (the Navigation step shown in the Applied Steps list has a different name here on line 3).
We want to add a new step to the query, ideally without breaking any of the existing steps! One interesting feature of M queries is that their instructions aren't executed sequentially as you might expect if you're familiar with programming languages such as VBA. This means that we can write our new step wherever we like in the let block.
It probably makes sense to put our new code below what's already happened so let's add it to the bottom of the let block. Before doing this, make sure you add a comma to the end of the previous line (steps in Power Query must be separated by commas.
Add a comma to the end of line 4.
You can then add the new step on the next line. Here's the new code I've added:
The code to extract the value from the cell.
The code on line 6 is a comment to describe what we're doing. Comments begin with two forward slashes and it's good practice to include them.
The code on line 7 is the new step beginning with the name of the variable, #"Get Sheet Title", that we're storing the result in. After the = sign we're using the Record.Field function to return the value of a cell by specifying the number of the row from a variable which contains a table, #"Changed Type"{0} (confusingly, rows are numbered from 0 in code and from 1 in the table view), and the name of the column, "Column1".
If you want to see the result of the new code, you can change the in block to return the value stored in the #"Get Sheet Title" variable.
The in block controls the final output of your query.
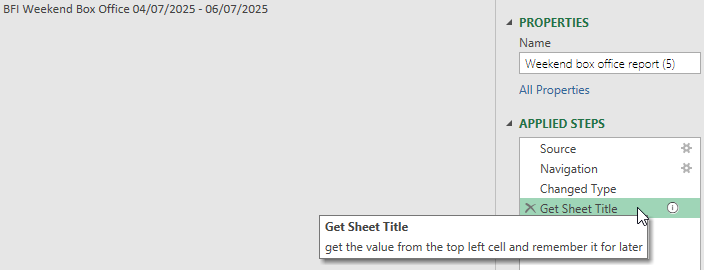
After clicking Done on the code editor dialog box, here's what you should see:
Selecting the new step should display the value of the variable.
There are many ways you could now produce a new column which shows the value of the variable. As we've started writing code, let's continue with that method. Start by re-opening the M code editor by choosing Home | Advanced Editor from the ribbon. Then add a new step as shown below:
The new code to generate the custom column.
Start by adding a comma to the end of line 7 followed by a comment or two to describe what you're doing. On line 11 I've added a new variable called #"Add Label Column" and used the Table.AddColumn function to assign a value to it. The first argument says that I want to add my new column to the table returned by the #"Changed Type variable. The second argument, "Sheet Title", is the name I want for the new column. The third argument, each #"Get Sheet Title" means: populate each row of the new column with the value from the #"Get Sheet Title" variable.
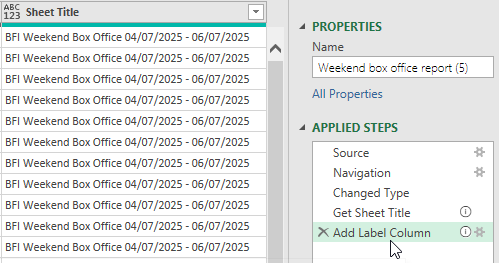
Don't forget to change the name of the variable in the in block to return the result of your new step, then click Done to see the result.
The new column will appear at the right of the table and each row should show the value of the top left cell of the original worksheet.
You can now continue adding new steps, either by writing code or using the admittedly simpler ribbon and right-click menu options!
Kingsmoor House
Railway Street
GLOSSOP
SK13 2AA
Landmark Offices
99 Bishopsgate
LONDON
EC2M 3XD
Holiday Inn
25 Aytoun Street
MANCHESTER
M1 3AE
© Wise Owl Business Solutions Ltd 2025. All Rights Reserved.