Read our blogs, tips and tutorials
Try our exercises or test your skills
Watch our tutorial videos or shorts
Take a self-paced course
Read our recent newsletters
License our courseware
Book expert consultancy
Buy our publications
Get help in using our site
547 attributed reviews in the last 3 years
Refreshingly small course sizes
Outstandingly good courseware
Whizzy online classrooms
Wise Owl trainers only (no freelancers)
Almost no cancellations
We have genuine integrity
We invoice after training
Review 30+ years of Wise Owl
View our top 100 clients
Search our website
We also send out useful tips in a monthly email newsletter ...
Adding data labels to a chart using VBA Part four of a five-part series of blogs |
---|
Adding basic data labels to a chart can be done without using any programming code. This blog, however, shows you how to fine-tune Excel chart labels using VBA (Visual Basic for Applications) macros.
|
All of the code that we've written so far in this blog series has been necessary, but hasn't actually done anything useful to our chart yet! This penultimate article of the series explains how to write code to create the data labels, before the final article provides a few suggestions for tidying things up.
Before we can set the text that appears in the data labels, we need to make sure that the data series actually has labels ready for us to change! One way to do this is by manually adding data labels to the chart within Excel, but we're going to achieve the same result in a single line of code. To do this, add the following line to your code:
'make sure data labels are turned on
FilmDataSeries.HasDataLabels = True
This simple bit of code uses the variable we set earlier to turn on the data labels for the chart. Without this line, when we try to set the text of the first data label our code would fall over. Now that we've ensured the data labels are available we can finally move on to changing their text to match the film names.
The technique we're going to use to label our data points is to loop over the collection of cells containing film names. For each film in our list, we're going to change the text of the corresponding data label to be the same as the film name. The code we need to loop over a collection of objects is shown below. Add this into your code:
'loop over the cells in the list of films
For Each SingleCell In FilmList
Next SingleCell
These two lines use our two Range variables to look at each individual cell in the list one at a time. All we need to do now is fill in the middle of the loop so that we actually do something with those cells! Change the code you have just added so that it looks like this:
'loop over the cells in the list of films
For Each SingleCell In FilmList
FilmDataSeries.Points(FilmCounter).DataLabel.Text = SingleCell.Value
FilmCounter = FilmCounter + 1
Next SingleCell
The first line inside the loop finds the first data point in the film data series (remember that earlier we set our FilmCounter variable to the value of 1). It then changes the text of the data label to be equal to the value of the cell we're currently looking at, i.e. the first cell in the list of films.
After changing the first data label we add 1 to the value of the FilmCounter variable before looping back to the top of the loop and repeating the same set of instructions for the next film in the list.
When we run out of films, the loop will automatically end, hopefully leaving us with a beautifully labelled chart!
We've written all the code and our program is ready to be tested. Before you do anything else, make sure you've saved your Excel workbook. You can do this from within Excel or the VB Editor, but make sure you do it, because once your code has run you won't be able to undo the actions it performs. You might see a warning message like the one shown below:
If you see this message, click No, and then choose to save the file as a Macro Enabled Workbook.
Once you've successfully saved your file you can finally run your code. To do this from the VB Editor, click anywhere in the subroutine you've written and press the F5 key on the keyboard (crossing your fingers is optional and probably won't help).
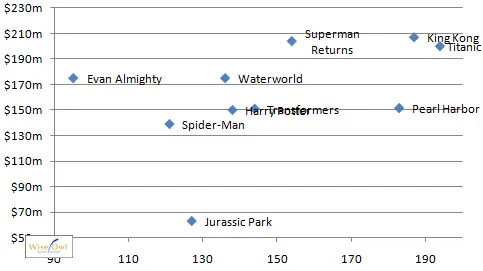
If everything worked and you didn't see any error messages, try switching back into Excel (press ALT and F11 again to do this) and see if your chart has data labels containing the film names.
What you should see if everything has gone according to plan.
If something went wrong, don't panic! Try checking these things first:
Go back over the code and make sure that you've spelt everything correctly.
Make sure that your list of film names are in the cells you've referred to in your code.
Make sure that the chart you are trying to label is the only one in the worksheet.
Make sure that when you run your code, you have selected the worksheet that contains your chart.
If you've tried all of the above and it still doesn't work you can try copying the code shown below into your own module, or download the full example by clicking here.
Sub CreateDataLabels()
Dim FilmDataSeries As Series
Dim SingleCell As Range
Dim FilmList As Range
Dim FilmCounter As Integer
FilmCounter = 1
Set FilmList = Range("A2", "A11")
Set FilmDataSeries = ActiveSheet.ChartObjects(1).Chart.SeriesCollection(1)
FilmDataSeries.HasDataLabels = True
For Each SingleCell In FilmList
FilmDataSeries.Points(FilmCounter).DataLabel.Text = SingleCell.Value
FilmCounter = FilmCounter + 1
Next SingleCell
End Sub
The final part of this series provides a few suggestions of ways to improve your program, including a better way to run it.
This blog wouldn't be complete without the obligatory link to our Excel training course information and VBA course info!
Parts of this blog |
---|
|
Some other pages relevant to the above blogs include:
Kingsmoor House
Railway Street
GLOSSOP
SK13 2AA
Landmark Offices
99 Bishopsgate
LONDON
EC2M 3XD
Holiday Inn
25 Aytoun Street
MANCHESTER
M1 3AE
© Wise Owl Business Solutions Ltd 2024. All Rights Reserved.