Flappy Bird in Excel VBA - Playing Sounds
Useful Links
Return to the Flappy Bird in Excel VBA Tutorial index.
Download Flappy Owl Pt13 - Sounds.
Introduction
In modern games designing sounds and music is a huge and complicated task -
what you can hear in a game is just as important as what you can see. Having
said that, in our game the sounds are going to be extremely basic. In fact,
we're not even going to create our own sounds. Instead we're going to steal some
of the sound effects that are already included in Windows.
Using sounds that are a standard component of Windows will make sure the game
will work on as wide a range of computers as possible. If you were interested in
using better sound effects there are plenty of sites offering free files which
you can find easily with a little Googling. Alternatively you could try creating
your own sound effects using a free tool such as
Audacity.
Creating the SoundPlayer Class
We'll create a class to encapsulate all of the code associated with playing
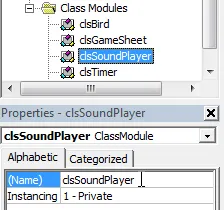
sounds in the game. Start by inserting a new class module and renaming it in the
usual way:

The new class module.
There's one Windows API function which we need to declare, along with a constant
to make life a little easier when we call the function. Add the following code
to the top of the module:
Option Explicit
#If Win64 Then
Private Declare PtrSafe Function sndPlaySound _
Lib "winmm.dll" Alias "sndPlaySoundA" ( _
ByVal lpszSoundName As String, _
ByVal uFlags As Long) As Long
#Else
Private Declare Function sndPlaySound32 _
Lib "winmm.dll" Alias "sndPlaySoundA" ( _
ByVal lpszSoundName As String, _
ByVal uFlags As Long) As Long
#End If
Private Const SND_ASYNC = &H1
The function sndPlaySound32 accepts two arguments; the file
name of the sound to play, and a set of flags which tells the sound how to
behave. We've declared the constant SND_ASYNC which, if we pass
it into the second parameter of the function, tells the sound to play
asynchronously. What that means is that other code can continue to execute while
the sound is being played.
We won't use any other flags for this function in our game but, just for
reference, here are a few other flags that we could have used. As usual for
Windows API code I've copied this from the win32api.txt file:
Public Const SND_SYNC = &H0
Public Const SND_NODEFAULT = &H2
Public Const SND_LOOP = &H8
Public Const SND_NOSTOP = &H10
Next we'll create a simple method in the class module which will play the
sound that we choose. Add the following subroutine at the bottom of the module:
Public Sub Play(SoundPath As String)
sndPlaySound32 SoundPath, SND_ASYNC
End Sub
Choosing Sounds to Play
Now we need to choose the sound files that will be played. As I mentioned
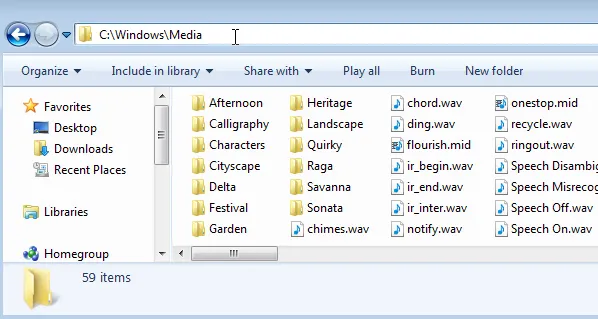
earlier, we're going to use standard Windows sounds for our game. You can find
these files in a standard folder as shown in the image below:

The standard folder is
C:\Windows\Media. Depending on which
version of Windows you have you may find different sounds are installed.
For our game we'll only use two sound effects: one for the flap and dive sound
and one other for the crash sound. The standard paths of these sounds are:
- Flap/Dive - C:\Windows\Media\recycle.wav
- Crash - C:\Windows\Media\Windows Critical Stop.wav
We'll store these file paths in public variables in the class module. We also
want to make sure that we can find the files if the user doesn't have Windows
installed in the default directory of C:\Windows. To do this
we'll use the Environ function to return the path of the
Windows root folder. Add the following variables at the top of the class module:
Public SoundFlap As String
Public SoundCrash As String
Now create the constructor for class module by using the drop down lists at
the top of the code page. Add code to the procedure so that it looks like this:
Private Sub Class_Initialize()
SoundFlap = Environ("SystemRoot") & _
"\Media\Recycle.wav"
SoundCrash = Environ("SystemRoot") & _
"\Media\Windows Critical Stop.wav"
End Sub
If you're using different sound files simply change the file paths to match
the location of the sound files that you've decided to use.
You can see the result of the Environ function using the
Immediate window - from the menu choose View |
Immediate Window to display it:

Type this into the window and press Enter.
The result of the function is the directory in which Windows has been installed
on the machine:

It's
now fairly simple to concatenate a complete file path.
Playing Sounds During the Game
In order to play sounds we need to create a new instance of our sound player
class. We could do this in several places within the project but for this
particular game all of the sounds are associated with events of the bird. It
therefore makes sense to declare our sound player variable within the
clsBird class module. Go there now and add this declaration to the top
of the module:
Private SoundPlayer As clsSoundPlayer
Now go to the Class_Initialize subroutine and add this line
to the start of the procedure:
Private Sub Class_Initialize()
Set SoundPlayer = New clsSoundPlayer
Now go to the Flap and Dive subroutines and
add a line to each one so that they look like this:
Private Sub Flap()
BirdVerticalMovement = FlapHeight
SoundPlayer.Play SoundPlayer.SoundFlap
End Sub
Private Sub Dive()
BirdVerticalMovement = DiveDepth
SoundPlayer.Play SoundPlayer.SoundFlap
End Sub
Now go to the Colliding property. We need to play the crash
sound whenever we detect a collision so find the two lines which say
Colliding = True and add a line below each one to play a sound:
Colliding = True
SoundPlayer.Play SoundPlayer.SoundCrash
Remember that you need to do this twice; once for a collision with the top
wall and once for a collision with the bottom wall.
Running the Game with Sounds
Now all you need to do it test the game. When you press the up or down arrow
keys you should hear the recycle bin sound effect which, if you suspend your
disbelief for just a moment, almost sounds like the bird flapping its wings
furiously. You should also hear the crash sound effect if you collide with the
walls. Remember that you can press y to continue or n
to quit if you collide.
If you didn't hear any sound effects make sure that you've turned your
speakers on (as I've just neglected to do, duh!) and ensure that you've used the
correct file paths. You can, as always, download a working version at the top of
this page.
What's Next
The next part of the tutorial looks at how to create a class for writing
messages to the game window.


